Hello everyone! Today, we are going to address a common problem in Windows 10 – the issue where the Wi-Fi option doesn’t appear. If you’ve clicked around and couldn’t find the Wi-Fi settings, even in the Network section, don’t worry. We’ll walk you through the procedures of resolving this problem.
Step 1: Check Your Network Adapter
First, make sure your network adapter is operational:
- Press
Win + Xand select “Command Prompt (Admin).” - When prompted for permission, click “Yes.”
- In the Command Prompt, type the following command and press Enter:
pingIf you receive a reply, your network adapter is working fine with no hardware problems. Let us proceed to the next phase.

Step 2: Verify Wi-Fi Service
Next, we’ll check if the Wi-Fi service is running:
- Press
Win + Rto open the Run dialog. - Type “services.msc” and click “OK.”
- Locate “WLAN AutoConfig.” Ensure it is running and set to “Automatic.” If not, right-click it, select “Start,” and then set it to “Automatic.” Click “Apply” and “OK.”

Now, restart your computer and check if the Wi-Fi option has reappeared.
Step 3: Reset Internet Settings
To reset your internet settings:
- Press
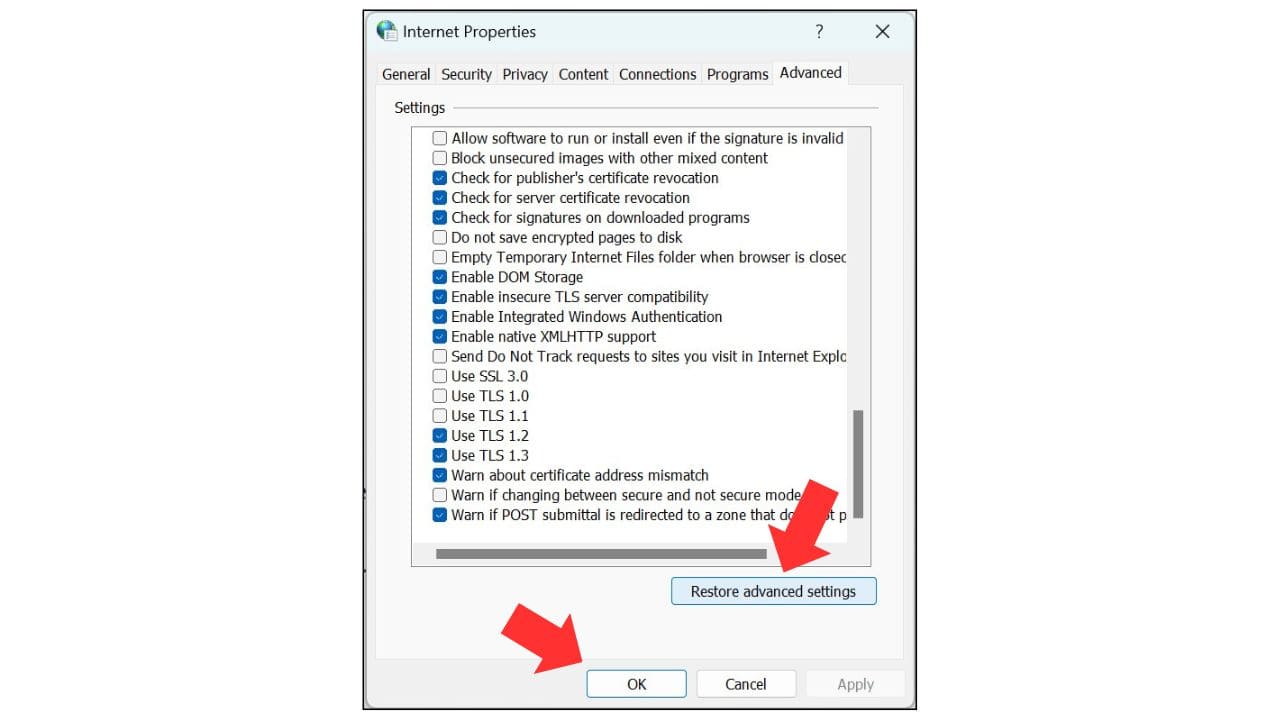
Win + Rto open the Run dialog. - Type “inetcpl.cpl” and click “OK.”
- In the Internet Properties window, go to the “Advanced” tab.
- Click “Restore advanced settings,” and then click “Apply.”

This step won’t directly fix the Wi-Fi issue but can help resolve it indirectly.
Step 4: Check Network Connections
- Press
Win + Rto open the Run dialog. - Type “ncpa.cpl” and click “OK.”
- Ensure that Wi-Fi is not disabled. If it is, click “Enable.” If it’s already enabled, try disabling and re-enabling it.
- Check for the Wi-Fi option in the Network and Internet settings.

Step 5: Update Wi-Fi Adapter Driver
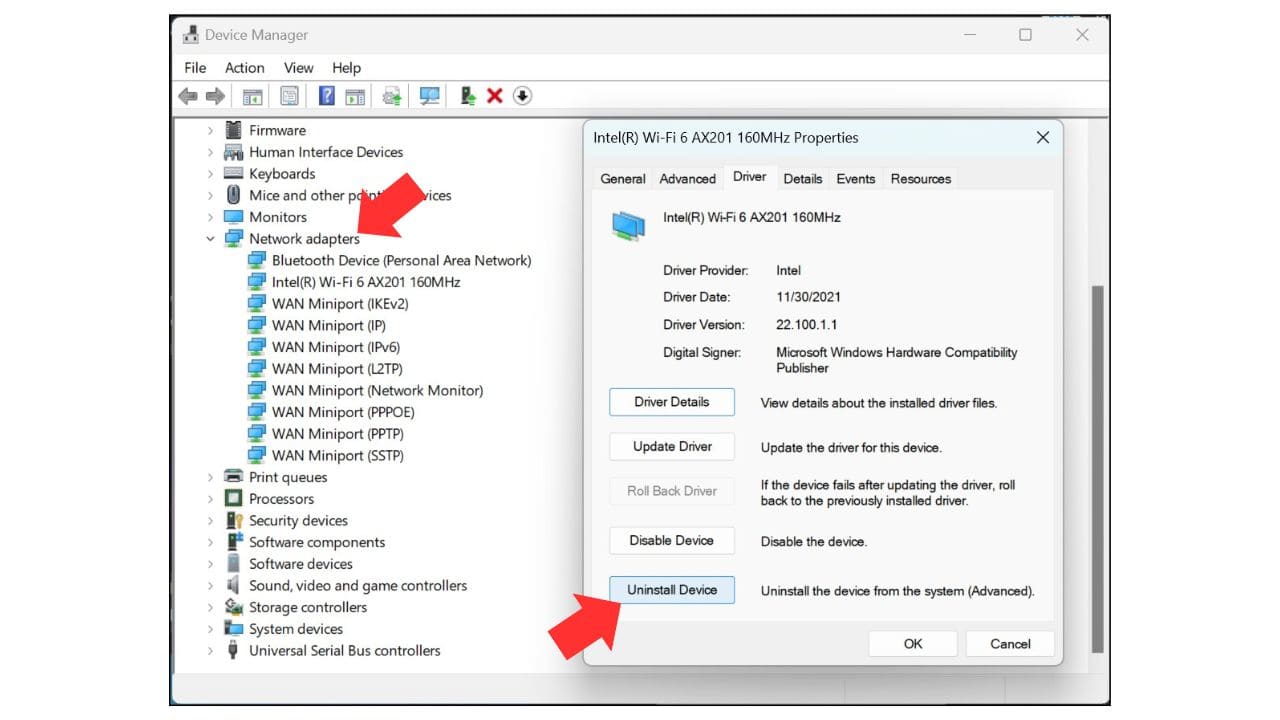
- Right-click the Start icon and select “Device Manager.”
- Find your network adapter (e.g., Intel Wi-Fi 6), right-click it, and choose “Update driver.”
- Select “Search automatically for drivers.”
- After updating, restart your computer.

If Wi-Fi is still not working, try updating with a different driver from the list if available.
Step 6: Uninstall Wi-Fi Adapter
- Right-click your network adapter in Device Manager.
- Select “Uninstall device” (uncheck the box for removing the driver).
- Restart your computer.

The adapter will be reinstalled automatically upon restart.
Step 7: Reset Network Profile
- Press
Win + Xand select “Command Prompt (Admin).” - Type the following two commands, pressing Enter after each:
   netsh winsock reset
netsh int ip reset- Restart your computer.
Step 8: Configure Services
- Press
Win + Rto open the Run dialog. - Type “msconfig” and click “OK.”
- In the System Configuration window, go to the “Services” tab.
- Check “Hide all Microsoft Services.”
- Click “Disable all.”
- Click “Enable all.”
- Click “Apply” and “OK.”

Now, restart your computer one final time.
If the Wi-Fi issue persists after completing all these steps, please let us know in the comments, and we’ll do our best to assist you further. Don’t forget to like and subscribe for more useful information! Have a wonderful day!