Upgrading your operating system to Windows 11 can bring a host of new features and improved performance to your computer. Whether you’re building a new PC or looking to update your existing Windows installation, using a USB drive to install Windows 11 is a convenient and efficient method. In this guide, we will walk you through the step-by-step process of creating a bootable Windows 11 USB drive and installing the latest version of Microsoft’s operating system on your PC. This method is especially useful if your computer lacks an optical drive or you want to perform a clean installation. So, let’s get started and make the transition to Windows 11 as smooth as possible.

Note: If you’ve done this before and just need specific information, feel free to use the timestamps and chapters to skip to the relevant sections.
Let’s get started with what you’ll need before we dive into the installation process:
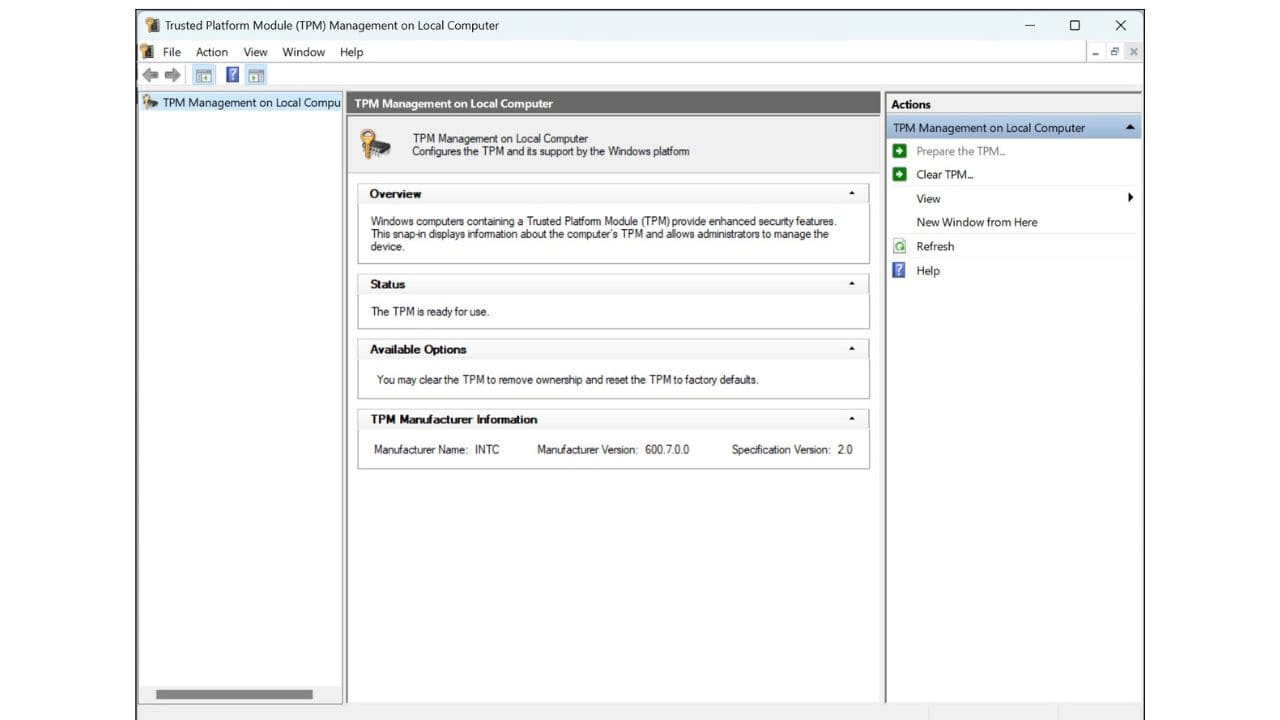
- TPM 2.0 Support: First, check if your computer supports TPM (Trusted Platform Module) 2.0. To do this, press Windows Key + R, type
tpm.msc, and hit OK. Look for “Specification Version” – it should indicate 2.0. If not, you may need to enable it in the BIOS settings. - 8GB or Larger USB Flash Drive: You’ll need an 8GB or larger USB flash drive for creating a bootable installation media. Remember to back up any data on the drive since it will be erased during the process.
- Windows 11 License: Depending on your situation, you’ll need a purchased copy of Windows 11. You can either create installation media on a different computer using the Media Creation Tool or purchase a copy with an activation code from a retailer.
- Internet Connection: Ensure you have an active internet connection as Windows 11 may need to download drivers during or after the installation.
- Drivers and Manual: Have your computer’s manual ready for reference, especially when configuring BIOS settings. Also, be prepared to download drivers for your hardware, such as the wireless or Ethernet drivers, in case Windows 11 doesn’t detect them immediately.
Now, let’s proceed with the installation process:
Check for TPM 2.0 Support
- Press Windows Key + R to open the Run command.
- Type
tpm.mscand hit OK. - Look for “Specification Version.” If it shows 2.0, your system supports TPM 2.0. If not, refer to your manual to enable it in the BIOS.

Prepare the USB Drive
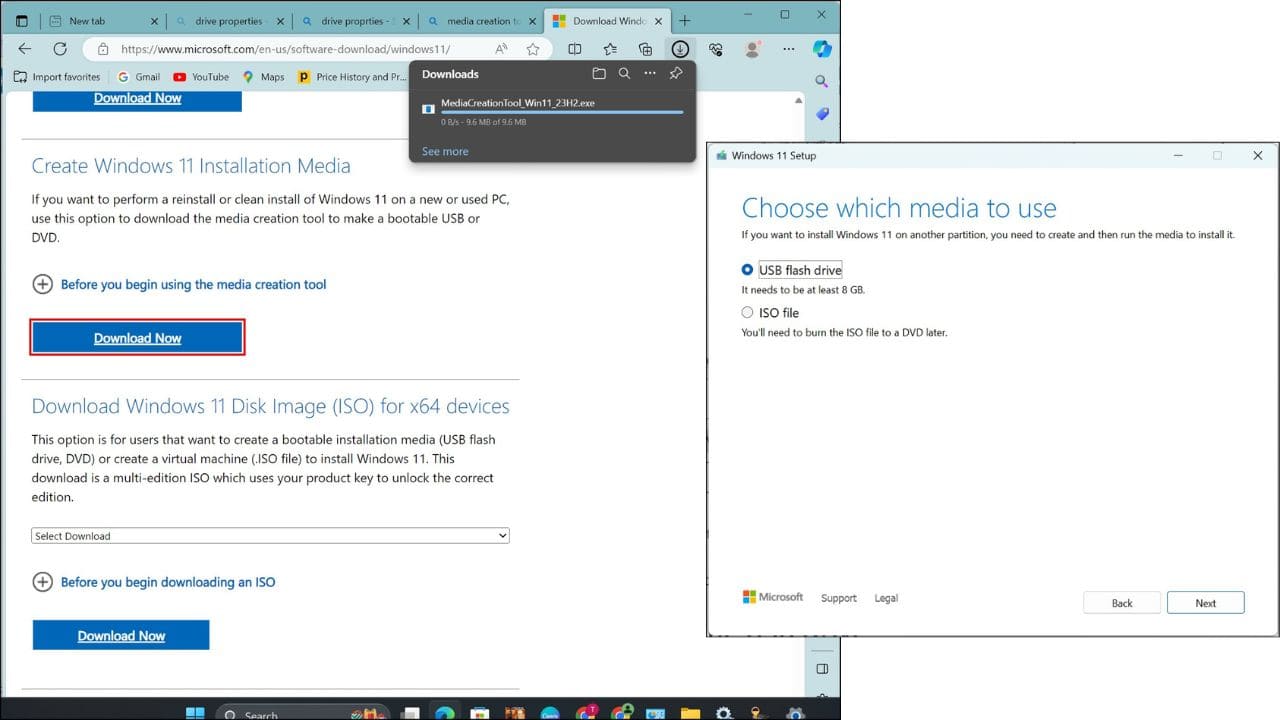
- Download the Media Creation Tool from the official Microsoft website.
- Run the tool, and it will guide you through the setup process. Ensure you have admin privileges.
- Select the language, edition, and architecture (if prompted). It’s usually best to go with the recommended settings.
- Choose to create a bootable USB flash drive with at least 8GB of space.
- Plug in your USB drive if you haven’t already and select it as the target for the installation files.
- Wait for the tool to download and set up the Windows 11 installation files on the USB drive.

Boot from the USB Drive
- Insert the USB drive into the computer where you want to install Windows 11.
- Boot your computer from the USB drive. The process for accessing the boot menu may vary by manufacturer, so consult your manual or perform a quick online search. Common keys for accessing the boot menu include F8 or Delete.
- Choose the USB drive from the boot menu, and if possible, select the UEFI option for a modern and efficient installation process.
Windows 11 Installation
- Once booted from the USB drive, you’ll see the Windows 11 installation screen.
- Follow the on-screen instructions to set your language, region, and keyboard preferences.
- Choose the edition of Windows 11 you want to install (typically based on your product key).
- Accept the license terms and conditions.
- Select “Custom Install” to begin the installation process.
- Choose the unallocated space on your drive where Windows 11 will be installed.
- Follow the prompts to complete the installation. During this time, your computer may restart.
- Set up your user account, password (if desired), and privacy settings.
- Once Windows 11 is installed, make sure to install any necessary drivers for your hardware.
Activation: If Windows 11 is not automatically activated, you can manually activate it. Go to “Settings” > “Update & Security” > “Activation,” and enter your product key if necessary.
That’s it! You’ve successfully installed Windows 11 on your computer. If you run into any problems or have any queries, please leave a remark and I’ll try my best to help.