Partitioning an SSD in Windows 10 or Windows 11 without formatting is a useful skill for optimizing your storage space without losing data. Whether you want to create separate partitions for different types of files or need to resize existing ones, this guide will walk you through the process step by step, ensuring that your data remains intact throughout the partitioning procedure.

Step 1: Access Disk Management
- Right-click on the Start icon in the bottom-left corner of your screen.
- Select “Run” from the context menu that appears.
A small “Run” window will pop up.
- In the “Run” window, type
diskmgmt.mscand press “OK.”
You can also use the search feature by typing “disk space management” in the search bar to access Disk Management.

Step 2: Navigate Disk Management
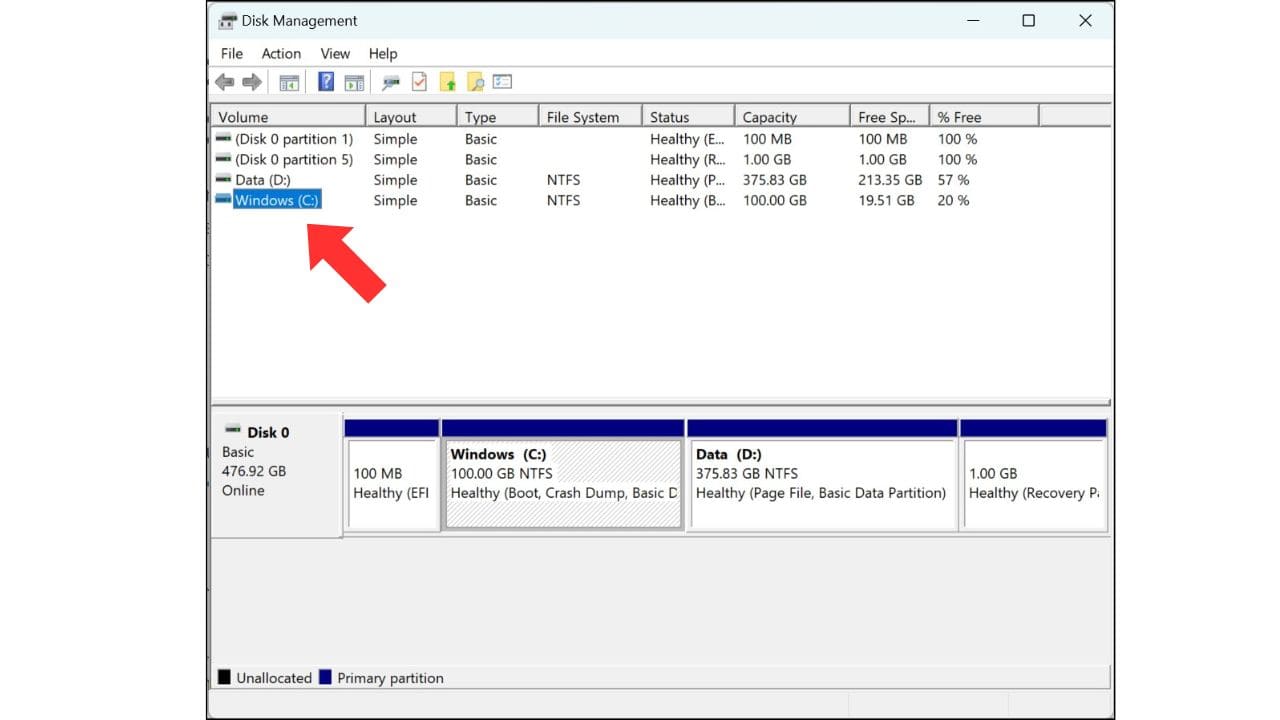
Once the Disk Management window is open, take a look at the available partitions and unallocated space. Here’s what you might see:
- Healthy partitions (e.g., C drive).
- Unallocated space.
- Healthy recovery partitions.
If you have unallocated space, you can create a new drive by right-clicking on it.
If you want to resize an existing partition, select the partition (e.g., C drive) and proceed to the next step.

Step 3: Shrink or Extend Volume
Shrinking a Volume (Creating Unallocated Space):
- Right-click on the partition you want to shrink (e.g., C drive).
- Select “Shrink Volume.”
The tool will calculate the available space in megabytes (MB).
- Specify the amount of space you want to shrink (e.g., 10,000 MB for 10 GB).
- Click “Shrink.”
You will now have unallocated space.

Extending a Volume (Using Unallocated Space):
If you have unallocated space and want to add it to an existing partition (e.g., C drive):
- Right-click on the unallocated space.
- Select “Extend Volume.”
Follow the wizard to allocate the unallocated space to the desired partition.
Step 4: Create a New Partition
If you have unallocated space and want to create a new partition:
- Right-click on the unallocated space.
- Select “New Simple Volume.”
Follow the New Simple Volume Wizard:
- Click “Next” on the welcome screen.
- Choose a drive letter (or leave the default).
- Choose the file system (NTFS is recommended).
- Check “Perform a quick format” for a faster process.
- Name your new partition.
- Click “Next” and then “Finish.”
Your new partition is now created.

Step 5: Verify Your New Partition
Go to “This PC” or “My Computer,” and you should see your new partition (e.g., D drive).
These steps apply to Windows 7, Windows 8, Windows 10, and Windows 11, ensuring compatibility across different Windows versions.
If you found this article helpful, Feel free to share your success in the comments section. Have a wonderful day!